Dispatch Tracker (Developer Guide)
Web-based system for real-time QR-based transfer delivery tracking.
Overview
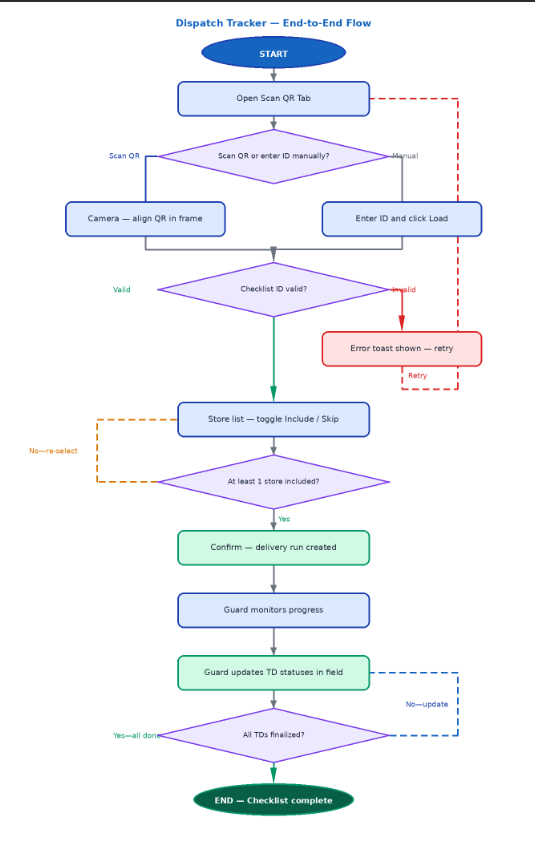
Dispatch Tracker is a centralized web application that enables real-time monitoring and status tracking of transfer delivery (TD) receipts through QR code scanning and manual entry. The system provides guard teams with a single interface to start delivery runs, update delivery outcomes as they happen, and maintain an accurate, up-to-date record of every store’s delivery status.
The system eliminates the need for manual status reporting, reduces the risk of missing or unrecorded deliveries, and ensures that all transfer outcomes — including failed attempts and cancellations — are properly documented with reasons and timestamps.
Target Users
Guard Teams
Problem Solved
· Delivery statusThere was previously tracked manually, with no centralizedsystem real-timeto view.track whether a transfer delivery was successfully received, failed, or cancelled — outcomes were entirely unrecorded after dispatch.
· TDIMD numbersand Audit had no way to be verified and recorded by hand, increasingverify the riskresult of humana error.delivery. There was no official record of which TDs were completed, rejected, or never attempted.
· FailedThere deliveries and cancellations were not formally recorded with reasons or timestamps.
· Dispatchers hadwas no visibility into whichhow storeslong hada beentransfer delivered,took werefrom indispatch progress,to store receipt, making it impossible to assess delivery performance or hadidentify failed.
· Last-minute promotional transfers could be missed or remain unrecorded, causing inventory discrepancies.
· The promo team could not properly verify, report, or receive unrecorded transfers.delays.
· The system resolves these issues by providingrecording every delivery outcome — with status, reason, timestamp, and responsible user — giving IMD, Audit, and the promo team a structured,clear, real-timeauditable tracking workflowtrail from dispatch start to final deliverystore confirmation.receipt.
Main Features
|
Category |
Features |
|
Dispatch Management |
Start a delivery run by scanning a checklist QR code or entering the checklist ID manually. |
|
Select which stores to include or skip before confirming a delivery run. |
|
|
View all active delivery checklists and their real-time progress at a glance. |
|
|
Search checklists by ID to quickly locate a specific run. |
|
|
Status Tracking |
Mark individual Transfer Documents (TDs) as Out for Delivery, Delivered, Failed, or Cancelled. |
|
Record a reason when marking a TD as failed. |
|
|
Re-attempt failed deliveries without creating a new dispatch record. |
|
|
View the full attempt history for each TD including timestamps and responsible user. |
|
|
Real-Time Monitoring |
Live status summary per checklist: out for delivery, partial, delivered, failed, cancelled. |
|
Store-level aggregate status derived automatically from individual TD statuses. |
|
|
Instant UI updates on status changes — no page refresh required. |
|
|
Visual indicators highlight checklists that are fully completed (green background). |
|
|
QR Scanning |
Scan printed checklist QR codes using the device camera. |
|
Automatic QR detection with a framed viewfinder and scan-line animation. |
|
|
Manual checklist ID entry as a fallback when a camera is unavailable. |
|
|
QR codes are single-use: already-dispatched checklists are rejected with a clear error. |
System Architecture
Frontend: React.js
Backend: Node.js + NestJS
Real-Time Communication: Socket.io
Queue System: BullMQ
Cache / Messaging: Redis
Database: Microsoft SQL Server
Authentication: JWT-based authentication
Printing Integration: Custom Printer Server
The system uses a client–server architecture with asynchronous job processing for printing operations.
Installation & Setup
Requirements
· Node.js v18+
· Visual Studio Code
· MSSQL Database
· Redis Server
Install Dependencies
Frontend and backend must be installed separately.
npm install
Environment Variables
Frontend
VITE_FRONTEND_URL=https://localhost:5173

VITE_ENV=development
Backend
Server
PORT=3000

NODE_ENV=development
MSSQL Database
Mssql_DB_SERVER=10.10.42.33

Mssql_DB_USER=your_username

Mssql_DB_PASSWORD=your_pass

Mssql_DB_DATABASE=

Mssql_DB_PORT=1433
Redis
REDIS_HOST=192.168.42.52

REDIS_PASSWORD=W3lc0meRedis2026!
Security
BCRYPT_ROUNDS=12

JWT_ACCESS_SECRET=624767096055869195900403461040280741571

JWT_REFRESH_SECRET=85713100746876451665600600936409954832080
FRONTEND_URL_LIVE=

FRONTEND_URL_DEV=http://localhost:5173
Run Locally
Frontend:
npm run dev
Backend:
npm run dev
Environments
Production Environment
- VM IP Address: 192.168.42.52
- Environment Name: Docker
- Purpose: Live system used by end users
Staging Environment
- VM IP Address: 192.168.42.52
- Environment Name: Docker
- Purpose: Testing environment before production deployment
Repositories
Production Repository
Frontend
- Repository Name: McjimReactLive
- Branch:
- main → Production
Backend
- Repository Name: McjimNestLive
- Branch:
- main → Production
Staging Repository
Frontend
- Repository Name: McjimReactStaging
- Branch:
- main → Staging
Backend
- Repository Name: McjimNestStaging
- Branch:
- main → Staging
Deployment Workflow
- Develop changes locally
- Push changes to the Staging Repository
- CI/CD pipeline automatically builds and deploys to Staging Environment
- Perform testing and validation in staging
- Once approved:
- Push the same changes to the Production Repository
How to Push Changes
Step 1: Develop and Commit Locally
Make your changes in your local environment, then commit:
git add .
git commit -m "your message"
Step 2: Push to Staging Repository
Push your changes to the staging repository:
git push origin main
This will automatically trigger the CI/CD pipeline to:
- Build the application
- Deploy to the Staging Environment
Step 3: Test in Staging
- Verify all features are working correctly
- Perform testing and validation
- Fix issues if needed (repeat Step 1–2)
Step 4: Push to Production Repository
Once staging is approved, push the same changes to the production repository:
git push origin main
This will automatically trigger the CI/CD pipeline to:
- Build the application
- Deploy to the Production Environment
Notes
- Always push to staging first before production
- Ensure both repositories contain the same code/version
- Do not skip staging validation before deploying to production
API Documentation
· Get the store
Endpoint:
GET /api/dispatch-tracker/get-storesDescription: Based on the dates selected by the user, it will retrieve all stores with their TD numbers.
Request body:
{
"checklist_id": "40000100"
}
Response:
· Create Dispatch
Endpoint:
POST /api/dispatch-tracker/create-dispatchDescription: Based on the dates selected by the user, it will retrieve all stores with their TD numbers.
Request body:
· Get Dispatch List
Endpoint:
GET /api/dispatch-tracker/get-dispatch-listDescription: Based on the dates selected by the user, it will retrieve all stores with their TD numbers.
Request body:
{
"search": "40000100"
}
Response:
· Update Store Status
Endpoint:
POST /api/dispatch-tracker/update-store-statusDescription: Based on the dates selected by the user, it will retrieve all stores with their TD numbers.
Request body:
{
"checklist_id": "40000100",
"store_id": 280,
"status": "delivered",
"reason": "",
"username": "MMALINAO"
}