
Dispatch Tracker (Developer Guide)
Web-based system for real-time QR-based transfer delivery tracking.
Overview
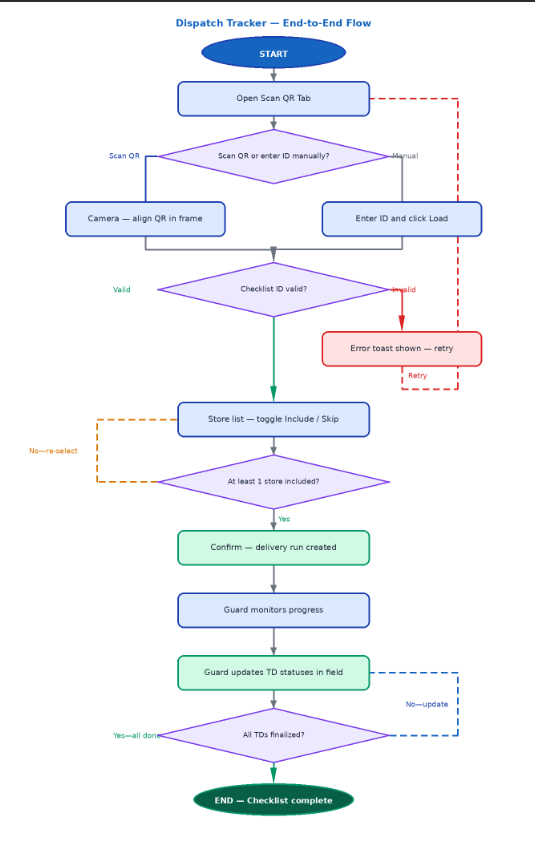
Dispatch Tracker is a centralized web application that enables real-time monitoring and status tracking of transfer delivery (TD) receipts through QR code scanning and manual entry. The system provides guard teams with a single interface to start delivery runs, update delivery outcomes as they happen, and maintain an accurate, up-to-date record of every store’s delivery status.
The system eliminates the need for manual status reporting, reduces the risk of missing or unrecorded deliveries, and ensures that all transfer outcomes — including failed attempts and cancellations — are properly documented with reasons and timestamps.
Target Users
Guard Teams
Problem Solved
· There was previously no system to track whether a transfer delivery was successfully received, failed, or cancelled — outcomes were entirely unrecorded after dispatch.
· IMD and Audit had no way to verify the result of a delivery. There was no official record of which TDs were completed, rejected, or never attempted.
· There was no visibility into how long a transfer took from dispatch to store receipt, making it impossible to assess delivery performance or identify delays.
· The system resolves these issues by recording every delivery outcome — with status, reason, timestamp, and responsible user — giving IMD, Audit, and the promo team a clear, auditable trail from dispatch to final store receipt.
Main Features
|
Category |
Features |
|
Dispatch Management |
Start a delivery run by scanning a checklist QR code or entering the checklist ID manually. |
|
Select which stores to include or skip before confirming a delivery run. |
|
|
View all active delivery checklists and their real-time progress at a glance. |
|
|
Search checklists by ID to quickly locate a specific run. |
|
|
Status Tracking |
Mark individual Transfer Documents (TDs) as Out for Delivery, Delivered, Failed, or Cancelled. |
|
Record a reason when marking a TD as failed. |
|
|
Re-attempt failed deliveries without creating a new dispatch record. |
|
|
View the full attempt history for each TD including timestamps and responsible user. |
|
|
Real-Time Monitoring |
Live status summary per checklist: out for delivery, partial, delivered, failed, cancelled. |
|
Store-level aggregate status derived automatically from individual TD statuses. |
|
|
Instant UI updates on status changes — no page refresh required. |
|
|
Visual indicators highlight checklists that are fully completed (green background). |
|
|
QR Scanning |
Scan printed checklist QR codes using the device camera. |
|
Automatic QR detection with a framed viewfinder and scan-line animation. |
|
|
Manual checklist ID entry as a fallback when a camera is unavailable. |
|
|
QR codes are single-use: already-dispatched checklists are rejected with a clear error. |
System Architecture
Frontend: React.js
Backend: Node.js + NestJS
Real-Time Communication: Socket.io
Queue System: BullMQ
Cache / Messaging: Redis
Database: Microsoft SQL Server
Authentication: JWT-based authentication
Printing Integration: Custom Printer Server
The system uses a client–server architecture with asynchronous job processing for printing operations.
Installation & Setup
Requirements
· Node.js v18+
· Visual Studio Code
· MSSQL Database
· Redis Server
Install Dependencies
Frontend and backend must be installed separately.
npm install
Environment Variables
Frontend
VITE_FRONTEND_URL=https://localhost:5173

VITE_ENV=development
Backend
Server
PORT=3000

NODE_ENV=development
MSSQL Database
Mssql_DB_SERVER=10.10.42.33

Mssql_DB_USER=your_username

Mssql_DB_PASSWORD=your_pass

Mssql_DB_DATABASE=

Mssql_DB_PORT=1433
Redis
REDIS_HOST=192.168.42.52

REDIS_PASSWORD=W3lc0meRedis2026!
Security
BCRYPT_ROUNDS=12

JWT_ACCESS_SECRET=624767096055869195900403461040280741571

JWT_REFRESH_SECRET=85713100746876451665600600936409954832080
FRONTEND_URL_LIVE=

FRONTEND_URL_DEV=http://localhost:5173
Run Locally
Frontend:
npm run dev
Backend:
npm run dev
Environments
Production Environment
- VM IP Address: 192.168.42.52
- Environment Name: Docker
- Purpose: Live system used by end users
Staging Environment
- VM IP Address: 192.168.42.52
- Environment Name: Docker
- Purpose: Testing environment before production deployment
Repositories
Production Repository
Frontend
- Repository Name: McjimReactLive
- Branch:
- main → Production
Backend
- Repository Name: McjimNestLive
- Branch:
- main → Production
Staging Repository
Frontend
- Repository Name: McjimReactStaging
- Branch:
- main → Staging
Backend
- Repository Name: McjimNestStaging
- Branch:
- main → Staging
Deployment Workflow
- Develop changes locally
- Push changes to the Staging Repository
- CI/CD pipeline automatically builds and deploys to Staging Environment
- Perform testing and validation in staging
- Once approved:
- Push the same changes to the Production Repository
- CI/CD pipeline automatically builds and deploys to Production Environment
How to Push Changes
Step 1: Develop and Commit Locally
Make your changes in your local environment, then commit:
git add .
git commit -m "your message"
Step 2: Push to Staging Repository
Push your changes to the staging repository:
git push origin main
This will automatically trigger the CI/CD pipeline to:
- Build the application
- Deploy to the Staging Environment
Step 3: Test in Staging
- Verify all features are working correctly
- Perform testing and validation
- Fix issues if needed (repeat Step 1–2)
Step 4: Push to Production Repository
Once staging is approved, push the same changes to the production repository:
git push origin main
This will automatically trigger the CI/CD pipeline to:
- Build the application
- Deploy to the Production Environment
Notes
- Always push to staging first before production
- Ensure both repositories contain the same code/version
- Do not skip staging validation before deploying to production
API Documentation
· Get the store
Endpoint:
GET /api/dispatch-tracker/get-storesDescription: Based on the dates selected by the user, it will retrieve all stores with their TD numbers.
Request body:
{
"checklist_id": "40000100"
}
Response:
· Create Dispatch
Endpoint:
POST /api/dispatch-tracker/create-dispatchDescription: Based on the dates selected by the user, it will retrieve all stores with their TD numbers.
Request body:
· Get Dispatch List
Endpoint:
GET /api/dispatch-tracker/get-dispatch-listDescription: Based on the dates selected by the user, it will retrieve all stores with their TD numbers.
Request body:
{
"search": "40000100"
}
Response:
· Update Store Status
Endpoint:
POST /api/dispatch-tracker/update-store-statusDescription: Based on the dates selected by the user, it will retrieve all stores with their TD numbers.
Request body:
{
"checklist_id": "40000100",
"store_id": 280,
"status": "delivered",
"reason": "",
"username": "MMALINAO"
}
No comments to display
No comments to display